Dark Site Installation
The Anyware Trust Center can be installed in dark sites, without a connection to the public internet. Dark site installation involves these general steps:
- Create a new VM to host the Anyware Trust Center.
- Choose a domain name for connections to the Anyware Trust Center.
- Configure DNS for the new machine.
- Create dummy gateway, if the machine does not already have a default gateway.
- Create a temporary VM that will download the required files.
- Get the installation script from our website.
- Transfer the files to the production VM.
- Run the installation script on the Anyware Trust Center machine.
1. Create the Dark Site Machine
Deploy a dedicated server to host the Anyware Trust Center. You must be able to transfer files to this machine, using USB drives, SSH, or another acceptable method.
The Anyware Trust Center requires a dedicated server with the following specifications (note that the network and software requirements are different from standard installations):
| Requirement | |
|---|---|
| Operating System |
|
| CPUs | 4 vCPUs |
| Memory | 16GB RAM |
| Disk | 120GB+, including 80GB+ disk space on /var for persistent volumes |
| Network | A default gateway is required, even without an internet connection. If the machine does not have one, a dummy route is required for installation. See Checking for a Default Gateway for instructions. |
| Software | DNF |
2. Choose a Domain Name
The Anyware Trust Center requires 5 domain names added to your DNS records. In this step, you're creating the base domain for the Anyware Trust Center, which will be used to construct the other 4 subdomains. You'll use this value in multiple locations during setup, so record the value and be ready to copy it.
In this procedure, we will use trust-center.example.com to demonstrate the domain name, and how it is leveraged to create the other required values.
3. Create DNS Records
Once your new dedicated server has been created, you must set up the following DNS A records that point to it. For each of the following items, replace <domain-name> with the domain name you recorded in the previous step.
<domain-name>api.<domain-name>endpoint-connector.<domain-name>ota.<domain-name>register.<domain-name>
Important: Supporting automatic Anyware Trust Center discovery
If you plan to support automatic Anyware Trust Center discovery by endpoints, you must also create a CNAME record that redirects anywaretrustcenter to register.<domain-name>.
Example: using trust-center.example.com
Using trust-center.example.com as the base domain, you would create DNS records for the following:
trust-center.example.comapi.trust-center.example.comendpoint-connector.trust-center.example.comota.trust-center.example.comregister.trust-center.example.com
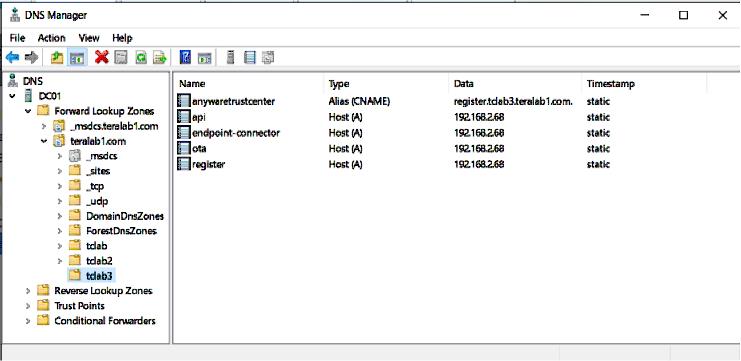
This example shows a different DNS configuration using Windows DNS Manager:
4. Verify or create a default gateway on the darksite machine
The Anyware Trust Center requires a default gateway even when an internet connection is not present. If you are not sure whether your machine already has one, see Checking For a Default Gateway. below, for steps to check and to create one if necessary.
If the machine already has a default gateway, this step is not required.
5. Create a temporary internet-connected machine
This machine will be used to download files and create an installer. The bundler machine must meet minimum requirements.
6. Download the site package and scripts
This section is done from the temporary internet-connected machine:
- Go to https://anyware.hp.com/find/product/anyware-trusted-endpoints/2024.03/anyware-trust-center.
- If you are not already logged in, click Log in to download and authenticate your session.
-
Click Downloads and scripts:

-
Read and accept the End User License Agreement. Once the agreement has been accepted, the download form is shown:
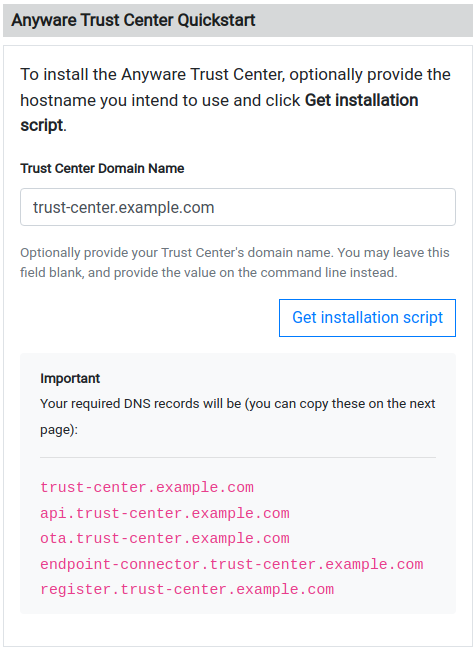
-
Provide your chosen FQDN—recorded earlier—in the Trust Center Hostname (FQDN) field, and click Get installation script.
Note: FQDN field is optional
The FQDN value is required to run the installer, but you do not have to supply it here. If you leave this field blank, you must manually add the actual FQDN to the script command before executing it.
-
Find the Dark Site Installation field, and copy it.

Copy the entire command displayed. There are two parts, and both are required: a curl command that downloads the installation script, and second command that executes the script.
The preparation script command looks like this:
curl -sSL https://dl.anyware.hp.com/{token}/trust-center/raw/names/trust-center-tgz/versions/{version}/trust-center_{version}.tar.gz | tar -xz && sudo ./trust-center-ctl install dark-site prepare --fqdn {trust-center-FQDN} --token {jwt token}Important: This script is time-limited
The generated command is valid for 1 hour. If the token expires before you run it, return to the download page and generate a new command. The time limit applies to running the prepare command, not installing the package. Once you have successfully generated the installation bundle, you can install the package at any time.
7. Copy downloaded files to the dark site machine
The following files are created by the preparation script. Transfer all three files to the isolated machine that will host the Anyware Trust Center using any acceptable method, such as USB drive or SSH:
- trust-center-ctl
- anyware-trust-center-bundle.tar
- anyware-trust-center-bundle.sha
Place these files in a clearly identified location on the new machine; this will become your installation directory, and subsequent commands will be run there.
Once these files are transferred, the temporary machine is no longer needed (note that you will need it, or a new instance of it, to upgrade the Anyware Trust Center or to push firmware updates to your Trusted Zero Clients).
8. On the dark site machine, run the installation command
Open a terminal window and navigate to your installation directory (the location you used when you copied the installation files). Run the following command:
sudo ./trust-center-ctl install --darksite
To validate the installation after it completes, run the following command:
sudo ./trust-center-ctl diagnose
All services should report healthy.
After Installing
After installation completes, you can set up your management tool to interact and manage Trusted Zero Clients via the Anyware Trust Center.
Refer to the API documentation installed with the Anyware Trust Center for complete details.
Note: The administrator password is automatically generated
The administrator password is automatically generated by the Anyware Trust Center installer, and has the ability to create service account keys. The generated password is placed in the config.yaml file in your installation directory.
<installation_folder>/config.yaml:
global:
images:
    registry: "docker.cloudsmith.io/teradici/trust-center"
    username: "teradici/trust-center"
    password: <repository password>
tc:
    domain: <your domain>
    password: <this is the auto-generated password>
    endpointUpdate:
      accessKey: <repository password>
      repository: "teradici/trusted-zero-client"
Troubleshooting
Installation failures
Installation can fail on some distributions or environments unless additional configuration is done. Check the additional configuration requirements listed above. If any steps were missed:
- Uninstall the Anyware Trust Center
- Perform the relevant configuration steps
- Install the Anyware Trust Center again. You will likely need to return to the download site and generate a new download command.
Creating a Support Bundle
Support bundles are archives that capture the current state of the Anyware Trust Center, and are used by our support team to diagnose and troubleshoot issues you may experience.
If you need to contact support, generate a support bundle using the procedure detailed in Creating a Support Bundle.
Checking for a Default Gateway
The Anyware Trust Center requires a default gateway to be set on the dark site machine, even without an internet connection.
To check whether a default gateway exists:
-
Open a console window, and run:
ip route | grep defaultIf the response looks similar to this example, then a default route already exists, and you can continue with installation:
default via 10.X.X.X dev ens5 proto dhcp src 10.X.X.X metric 100 -
If the response indicates that no default gateway is present, run the following commands to create a dummy route:
ip link add dummy0 type dummy
ip link set dummy0 up
ip addr add 203.0.113.254/31 dev dummy0
ip route add default via 203.0.113.255 dev dummy0 metric 1000